
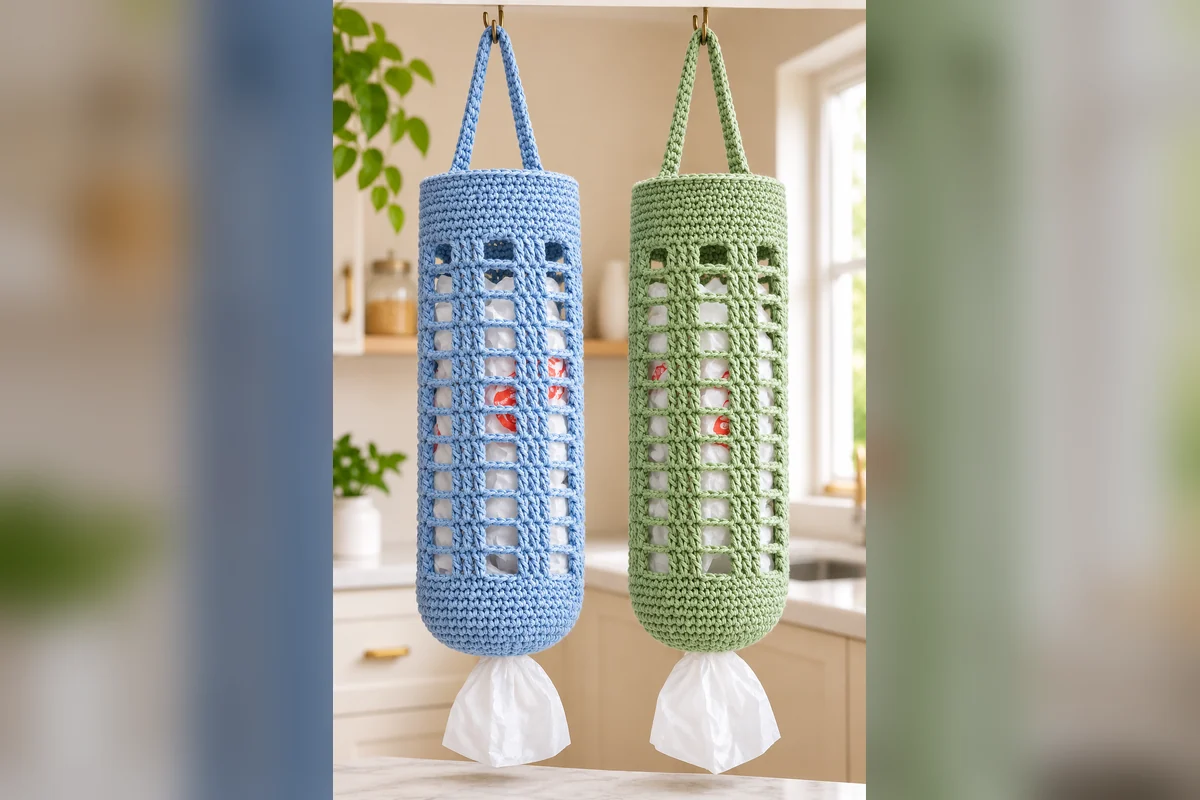
Are plastic grocery bags taking up too much space in your kitchen? A handmade crochet organizer can turn that everyday mess into something neat, practical, and beautiful. This Crochet Plastic Bag Holder Pattern is a simple and enjoyable project that gives your shopping bags a dedicated place while adding a lovely handmade touch to your home.
Designed with a beautiful open lattice body, smooth solid crochet bands, and a convenient hanging loop, this crochet plastic bag dispenser makes storing and retrieving grocery bags much easier. Its airy design lets you see the bags inside, while the elastic bottom opening helps keep everything in place until you need another bag.
The design looks especially beautiful in soft powder blue and sage green, just like the color combination shown in this project. You can also make it in cream, dusty pink, lavender, or any shade that matches your kitchen.
Whether you are an experienced crocheter or learning new stitches, this tutorial walks you through the complete construction, from the foundation ring to the lattice pattern and hanging loop. Follow the detailed rounds, check the stitch counts, and create your own useful crochet grocery bag organizer.
About This Crochet Plastic Bag Holder Pattern
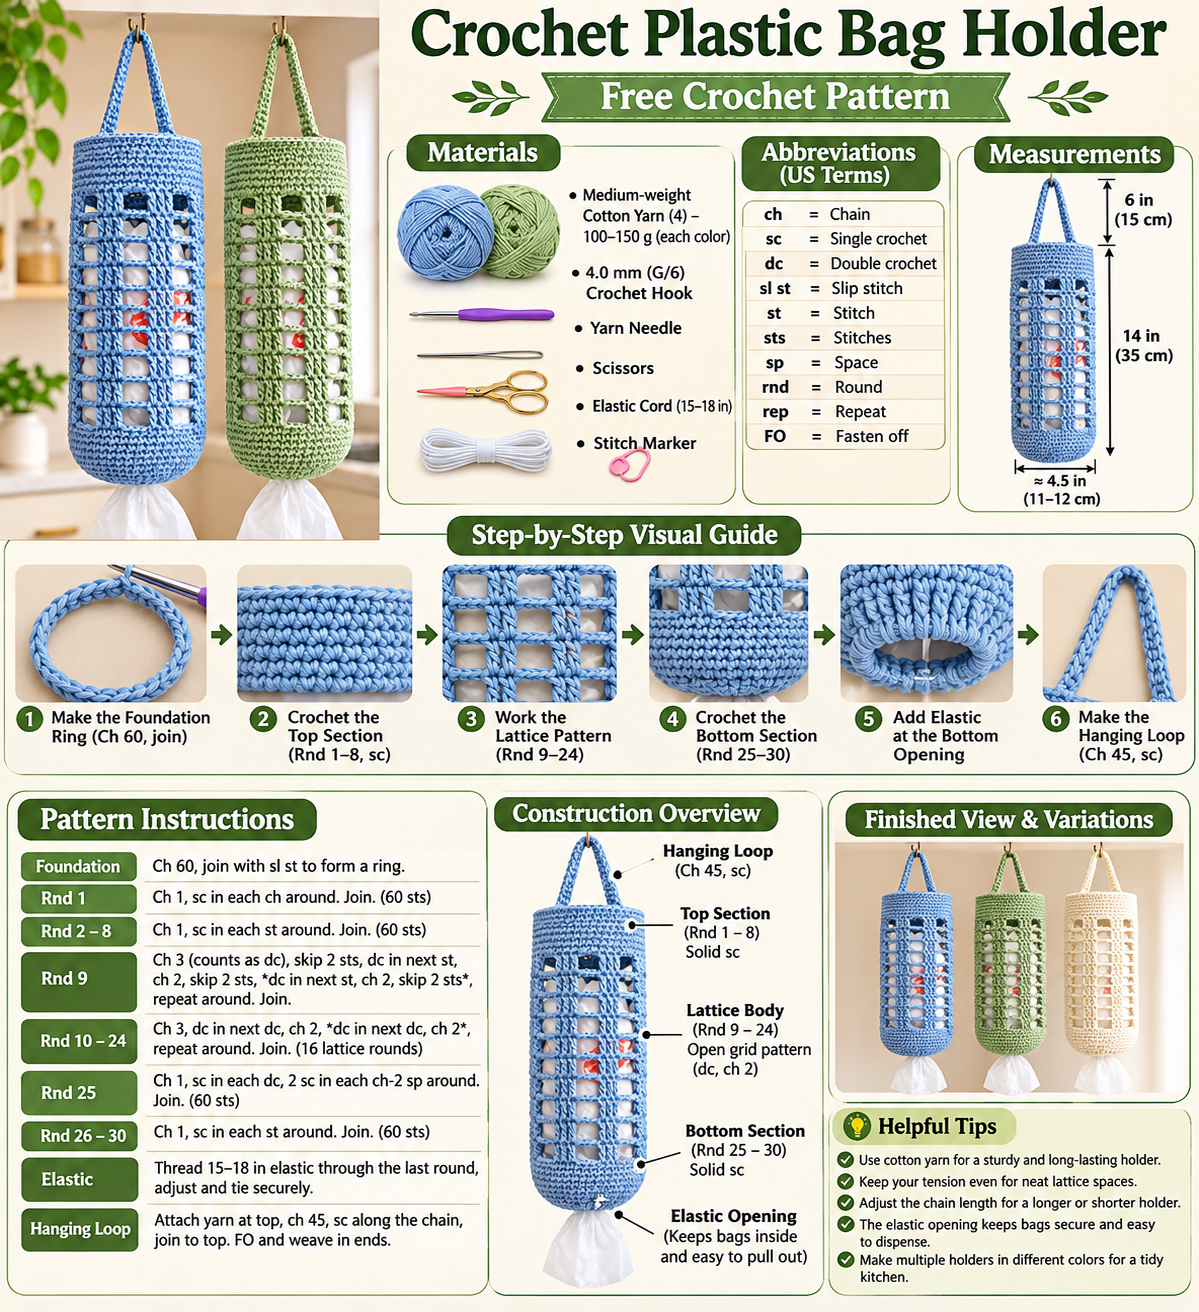
This hanging grocery bag dispenser is worked as a simple cylindrical tube. The upper and lower sections use single crochet stitches to create a firm border, while the middle section features an open grid pattern made with double crochet stitches and chain spaces.
The holder has two functional openings. The top opening is used to insert folded grocery bags, and the lower opening allows you to pull them out one at a time. An elastic cord around the bottom helps control the opening without making it difficult to remove bags.
A small crocheted loop at the top makes it easy to hang the finished holder on a kitchen hook, pantry hook, or another suitable storage spot.
Quick Pattern Overview
- Project: Hanging crochet plastic bag dispenser
- Skill level: Beginner to intermediate
- Construction: One continuous tube worked in joined rounds
- Stitches: Single crochet, double crochet, chain, and slip stitch
- Yarn: Medium-weight cotton yarn
- Hook: 4 mm crochet hook
- Estimated yarn: 100–150 g
- Estimated working time: 3–5 hours
- Finished body height: Approximately 14 inches (35 cm)
- Finished circumference: Approximately 14 inches (35 cm)
Table of Contents
- Materials and Supplies
- Crochet Abbreviations
- Gauge and Finished Measurements
- Understanding the Crochet Design
- Starting the Foundation Ring
- Crocheting the Solid Top Section
- Creating the Open Lattice Pattern
- Crocheting the Bottom Section
- Adding the Elastic Opening
- Making the Hanging Loop
- Finishing and Assembly
- Color and Size Customization
- Common Crochet Mistakes
- Frequently Asked Questions
1. Materials and Supplies
Before starting your Crochet Plastic Bag Holder Pattern, gather all the necessary supplies. Choosing the right yarn and hook will help create a sturdy holder that keeps its shape during everyday use.
Yarn
Use medium-weight cotton yarn, also known as category 4 yarn. Cotton is a good choice for this project because it provides clear stitch definition, has a comfortable texture, and creates a firm fabric.
You will need approximately 100–150 grams of yarn, depending on your tension, yarn brand, and desired length.
Recommended Colors
- Powder Blue: A soft and fresh shade that creates a bright, clean appearance.
- Sage Green: A natural color that complements neutral and modern kitchen interiors.
- Cream: A lovely alternative for a simple, minimal design.
You can use one color for the entire holder or change colors between the solid bands and lattice body.
Other Supplies
| Supply | Quantity |
|---|---|
| Medium-weight cotton yarn | 100–150 g |
| 4 mm crochet hook | 1 |
| Yarn needle | 1 |
| Sharp scissors | 1 pair |
| Elastic cord | 15–18 inches |
| Stitch marker | 1 |
2. Crochet Abbreviations (US Terms)
This tutorial uses standard US crochet terminology. Review these abbreviations before beginning so the instructions are easy to follow.
| Abbreviation | Meaning |
|---|---|
| ch | Chain |
| sc | Single crochet |
| dc | Double crochet |
| sl st | Slip stitch |
| st | Stitch |
| sts | Stitches |
| sp | Space |
| rnd | Round |
| rep | Repeat |
| FO | Fasten off |
Special Stitch Explanation
Chain-2 Space (ch-2 sp): This is the open space created by working two chain stitches between double crochet posts. These spaces form the attractive rectangular openings in the middle of the bag holder.
Joined Round: At the end of each round, use a slip stitch to join the last stitch or beginning chain to the appropriate starting stitch. Do not turn your work unless instructed.
3. Gauge and Finished Measurements
Gauge helps you achieve a consistent size. For this pattern, aim for approximately 16 single crochet stitches and 18 rounds measuring 4 inches (10 cm) when worked in single crochet using your selected yarn and 4 mm hook.
Make a small gauge swatch before beginning. If your stitches are too tight, try a larger hook. If they are too loose, use a smaller hook.
Approximate Finished Measurements
| Section | Measurement |
|---|---|
| Solid top section | Approximately 3 inches |
| Open lattice section | Approximately 8 inches |
| Solid bottom section | Approximately 3 inches |
| Total body height | Approximately 14 inches |
| Body circumference | Approximately 14 inches |
| Hanging loop | Approximately 6 inches high |
These are approximate targets rather than guaranteed dimensions. Your yarn thickness, tension, and crochet technique will affect the final measurements.
4. Understanding the Crochet Bag Holder Design
Before picking up your hook, it helps to understand how the different sections work together.
The Solid Top Band
The upper section is made with eight rounds of single crochet. It creates a neat border around the top opening and provides a sturdy area for attaching the hanging loop.
The Open Lattice Body
The middle section is made with double crochet posts separated by chain-2 spaces. The repeated spaces form a beautiful grid pattern that allows the stored bags to remain visible and easy to access.
The Solid Bottom Band
The bottom section returns to single crochet stitches. This creates a more secure edge and provides a suitable area for adding the elastic cord.
The Hanging Loop
A reinforced chain loop is attached to the top band so the holder can hang vertically. The loop should be strong enough to support the weight of the stored bags.
5. Starting the Foundation Ring
Begin with your chosen cotton yarn and 4 mm crochet hook. The holder is worked in joined rounds, starting with a foundation chain that forms the circumference of the tube.
Foundation Chain
Ch 60.
Check that your chain is straight and not twisted. Insert your hook into the first chain and join with a sl st to create a ring.
Foundation stitch count: 60 chains.
6. Crocheting the Solid Top Section
Now work the first eight rounds in single crochet. This creates the solid top border of the crochet plastic bag dispenser.
Round 1
Ch 1. Work 1 sc into each chain around. Join with a sl st to the first sc.
Total: 60 sc.
Rounds 2–8
Ch 1. Work 1 sc into each stitch around. Join with a sl st to the first sc.
Repeat the same instructions for all seven remaining rounds.
Total: 60 sc per round.
After completing Round 8, you should have a firm cylindrical section. Keep your stitches even because this top band will support the hanging loop.
Checking Your Work
- Count 60 stitches in every round.
- Make sure the tube is not narrowing or widening.
- Keep the joining seam aligned vertically.
- Avoid pulling the joining slip stitch too tightly.
7. Creating the Open Lattice Pattern
The lattice section is the main feature of this Crochet Plastic Bag Holder Pattern. It creates the attractive open-grid texture shown in the finished design.
For this section, you will work double crochet posts with two chain stitches between them. Keep the double crochet posts aligned from one round to the next.
Round 9 – Establish the Lattice Pattern
- Ch 3. This counts as the first dc.
- Skip the next 2 stitches.
- Work 1 dc into the next stitch.
- Ch 2.
- Skip the next 2 stitches.
- Work 1 dc into the next stitch.
- Repeat the sequence around.
- Join with a sl st to the top of the beginning ch 3.
Total: 20 double crochet posts and 20 chain-2 spaces.
Rounds 10–24 – Continue the Lattice
Ch 3 (counts as the first dc), ch 2, work 1 dc into the next dc post from the previous round.
Continue repeating: ch 2, 1 dc into the next dc post around.
Join with a sl st to the top of the beginning ch 3.
Total per round: 20 dc posts and 20 chain-2 spaces.
Repeat these instructions until you complete Round 24.
How the Lattice Pattern Works
The double crochet posts create the vertical lines, while the chain-2 spaces create the open windows. When the rounds are stacked, the spaces form a neat rectangular grid.
- Always work the next double crochet into a double crochet post.
- Do not work into the chain-2 spaces during the lattice rounds.
- Keep two chains between neighboring double crochet posts.
- Maintain 20 posts in every round.
- Use a stitch marker if you find it difficult to identify the first stitch.
Adjusting the Lattice Length
If you want a longer plastic bag holder, add more lattice rounds before starting the bottom band. For a shorter holder, remove a few rounds. Try to maintain an even length and keep the total number of rounds consistent around the tube.
8. Crocheting the Solid Bottom Section
After completing the lattice body, you will return to single crochet stitches. This creates the lower solid band and provides a firm edge for the dispensing opening.
Round 25 – Close the Lattice Gaps
Ch 1. Work 1 sc into each double crochet post. Work 2 sc into each chain-2 space around. Join with a sl st to the first sc.
Total: 60 sc.
Rounds 26–30 – Solid Bottom Band
Ch 1. Work 1 sc into every stitch around. Join with a sl st to the first sc.
Repeat for Rounds 26, 27, 28, 29, and 30.
Total: 60 sc per round.
Fasten off and weave in the yarn end securely. Keep the lower end open. Do not sew it closed because this is where the plastic grocery bags will be dispensed.
9. Adding the Elastic Bottom Opening
The elastic opening is an important functional feature. It helps prevent the stored bags from falling out while still allowing you to pull one bag through when needed.
How to Add Elastic
- Cut approximately 15–18 inches of suitable elastic cord.
- Thread the elastic through the stitches of the final bottom round using a yarn needle or safety pin.
- Bring both ends together.
- Adjust the elastic until the bottom opening is gathered slightly.
- Check that the opening is still large enough to pull out a grocery bag.
- Tie a secure knot and hide the ends inside the crochet fabric.
10. Making the Hanging Loop
The hanging loop makes this crochet grocery bag organizer easy to store on a kitchen hook. It is attached to the solid top band and should be reinforced carefully.
Hanging Loop Instructions
- Attach your yarn securely to the top edge of the holder.
- Ch 45 to create the hanging loop.
- Make sure the chain is not twisted.
- Join the chain back to the top edge near the starting point using a sl st.
- Work 1 sc into each chain along the loop.
- Join securely to the starting area.
- Fasten off and weave in the yarn ends.
For extra strength, reinforce both attachment points with additional stitches. If you want a longer hanging loop, increase the foundation chain. If you prefer a shorter loop, reduce the number of chains.
Making the Loop More Durable
For a stronger handle, work two rows of single crochet along the chain instead of one. Keep the stitches close and even so the loop does not stretch excessively when the holder is filled.
11. Finishing and Assembly
Your crochet plastic bag holder is nearly complete. A few finishing details will give it a clean appearance and make it ready for everyday use.
- Check all joining points for loose stitches.
- Weave in any remaining yarn ends.
- Make sure the lattice spaces are evenly aligned.
- Check that the bottom elastic is secure.
- Reinforce the hanging loop if necessary.
- Gently shape the cylindrical body with your hands.
- Insert a few clean, dry plastic grocery bags through the top opening.
- Hang the holder in a convenient kitchen or pantry location.
Final Quality Check
- Does the top opening allow bags to be inserted easily?
- Are all 20 lattice posts aligned?
- Is the bottom elastic secure but not too tight?
- Does the hanging loop feel strong enough?
- Can you remove one bag without pulling out the entire collection?
12. Color and Size Customization
One of the best things about making your own crochet plastic bag dispenser is the freedom to customize it. You can change the yarn color, body length, or hanging loop to match your storage needs.
Powder Blue Crochet Bag Holder
Powder blue gives the holder a fresh, clean appearance. It works beautifully in white, beige, and light-colored kitchens. Use one shade throughout the project for a coordinated look.
Sage Green Crochet Bag Holder
Sage green is a lovely choice for natural and modern interiors. Pair it with cream or ivory for a soft two-color variation.
Cream and Neutral Crochet Bag Holder
Cream, oatmeal, and beige shades create a simple handmade design. These neutral colors work well in farmhouse, minimalist, and rustic kitchens.
Making a Longer Holder
To increase the body length, add more lattice rounds before starting Round 25. Each additional round adds approximately the height of one lattice row. Check the overall length before making the solid bottom band.
Making a Wider Holder
For a wider holder, increase the foundation chain in multiples of three. This helps maintain the lattice repeat. You must also adjust the number of double crochet posts and the bottom round stitch count accordingly. Make a small test section to confirm the new stitch counts before continuing.
13. Common Crochet Mistakes and How to Fix Them
1. The Holder Is Twisting
This usually happens when the foundation chain is twisted before joining. Always check that the chain lies flat before making the first slip stitch.
2. The Lattice Spaces Look Uneven
Uneven chain tension can make the grid look inconsistent. Try to keep the two chain stitches between each double crochet post the same size throughout the project.
3. The Holder Is Too Wide or Too Narrow
Check your gauge and foundation chain. If the holder is too narrow, try a larger hook or increase the foundation chain in multiples of three. If it is too wide, use a smaller hook or reduce the foundation chain accordingly.
4. The Bottom Opening Is Too Tight
Loosen the elastic cord until a grocery bag can pass through comfortably. The elastic should gather the opening without completely closing it.
5. The Hanging Loop Feels Weak
Reinforce both attachment points with additional single crochet stitches. A stronger loop will support the weight of the stored bags more comfortably.
14. Care and Storage Tips
Keep your handmade organizer looking fresh by following a few simple care steps.
- Remove all plastic bags before washing.
- Follow the care instructions on your yarn label.
- Hand wash gently in cool water when suitable for your yarn.
- Use mild detergent and avoid harsh chemicals.
- Allow the holder to dry completely before using it again.
- Store only clean and dry grocery bags inside.
15. Frequently Asked Questions
1. Is this Crochet Plastic Bag Holder Pattern suitable for beginners?
Yes. This project uses basic crochet stitches, including chain, single crochet, double crochet, and slip stitch. Beginners should practice the lattice stitch with a small sample before making the full holder.
2. How much yarn is needed for a crochet plastic bag holder?
Approximately 100–150 grams of medium-weight cotton yarn is a useful starting estimate. The exact amount depends on your yarn brand, hook size, tension, and the length of your holder.
3. Which yarn is best for a crochet grocery bag dispenser?
Medium-weight cotton yarn is a good choice because it creates a firm fabric and gives the lattice pattern clear definition. You can also use a suitable cotton blend if you prefer a softer texture.
4. How do you make the open lattice crochet pattern?
The lattice pattern is created by working double crochet posts separated by chain-2 spaces. Repeat the posts and spaces around each round, keeping the posts aligned vertically to form an even grid.
5. Why does a crochet plastic bag holder need an elastic bottom?
The elastic helps gather the lower opening so grocery bags remain inside while still allowing you to pull them out one at a time. It also gives the bottom edge a neat, gathered appearance.
6. Can I make this crochet plastic bag holder in different sizes?
Yes. You can adjust the foundation chain to change the circumference and add or remove lattice rounds to change the length. Keep the stitch repeat and round counts consistent when changing the size.
7. Can I use acrylic yarn instead of cotton yarn?
Yes, a suitable medium-weight acrylic yarn can be used. However, acrylic may stretch differently from cotton, so make a gauge swatch and check how the lattice behaves when the holder is filled.
8. How do I hang my finished crochet grocery bag holder?
Use the reinforced crochet loop at the top to hang the dispenser on a suitable kitchen or pantry hook. Choose a secure location where the holder is easy to reach.
9. How many plastic bags can a crochet bag holder store?
The capacity depends on the finished dimensions, yarn stretch, and thickness of the grocery bags. The open cylindrical design can accommodate a useful collection of folded or loosely rolled bags.
10. Can I sell crochet plastic bag holders made using this pattern?
You can make finished holders for personal use or as handmade gifts. If you plan to sell finished products, check any applicable pattern-use terms and local selling requirements.
Final Thoughts
This Crochet Plastic Bag Holder Pattern is a lovely combination of practical storage and handmade style. The solid crochet borders, open lattice body, and reinforced hanging loop create a useful organizer that keeps everyday grocery bags together and easy to access.
Choose powder blue, sage green, or your favorite yarn color to make a dispenser that complements your home. Once you understand the basic construction, you can adjust its length, experiment with different shades, and make several matching holders for your kitchen or pantry.
With a little cotton yarn and a crochet hook, you can turn a simple storage need into a beautiful handmade project.
Happy crocheting!


