
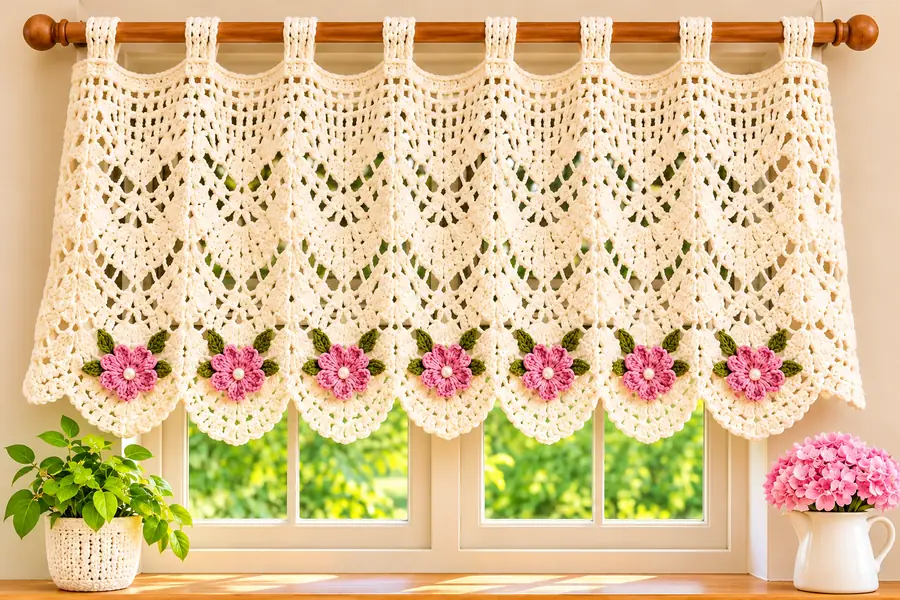
Looking for a charming way to make your windows more beautiful? This crochet floral window curtain brings a lovely handmade touch to any room. Its delicate ivory lace, sweet pink flowers, and tiny green leaves create a soft, romantic look that feels both timeless and elegant.
The pretty scalloped edges and airy crochet stitches make this curtain especially charming for cottage-style, vintage, or farmhouse interiors. Whether you hang it in your kitchen, bedroom, or living room, it adds warmth and personality without making the space feel heavy.
Ready to create your own? This tutorial includes the materials, stitch instructions, flower and leaf details, and a step-by-step crochet pattern to guide you through the project. Pick your favorite cotton yarn, grab your crochet hook, and enjoy making a beautiful curtain for your home!
Why You Will Love This Crochet Floral Curtain
This floral crochet curtain is more than a simple window decoration. It combines delicate lacework with beautiful handmade flowers to create a charming piece that makes any room feel warm and welcoming.
The ivory crochet fabric gives the curtain a light and airy appearance, while the pink flowers add a lovely pop of color. Small green leaves bring the floral details to life and make the entire design look fresh and natural.
One of the best things about this project is its versatility. You can hang it above a kitchen window, use it as a decorative bedroom valance, or add it to a cozy reading corner. Its vintage-inspired appearance also works beautifully with farmhouse and cottage-style interiors.
What Makes This Design Special?
- Beautiful ivory lace with an openwork crochet pattern.
- Raised pink flowers with delicate pearl-style centers.
- Small green leaves for a natural floral appearance.
- Decorative scalloped edges along the bottom.
- Convenient crochet hanging loops for easy installation.
Materials Needed for the Crochet Curtain
Before starting, gather all your supplies. Choosing good-quality cotton yarn will help your curtain maintain its shape and show the beautiful stitch details clearly.
Complete Materials Checklist
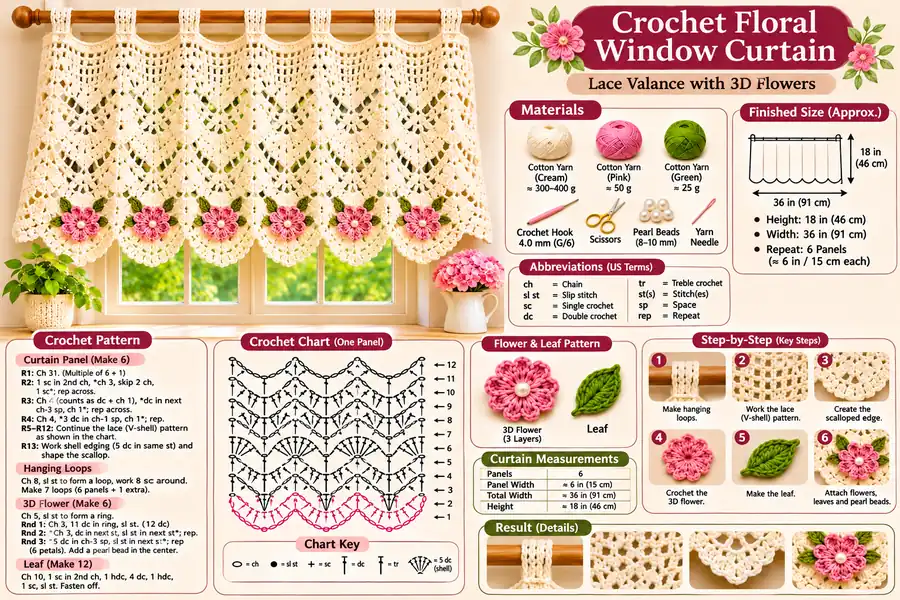
- Cream cotton yarn: Approximately 300–400 grams for the main curtain.
- Pink cotton yarn: Approximately 50 grams for the decorative flowers.
- Green cotton yarn: Approximately 25 grams for the leaves.
- Crochet hook: 4.0 mm (G/6), or a size that gives you a suitable fabric.
- Scissors: For cutting yarn neatly.
- Tapestry needle: For weaving in yarn ends and attaching decorations.
- Pearl beads: Six to seven small 8–10 mm beads for flower centers.
- Measuring tape: For checking the curtain dimensions.
- Stitch markers: Optional, but useful for marking repeated sections.
For a lightweight curtain, choose smooth cotton yarn rather than thick winter yarn. Cotton provides good stitch definition and gives the lace pattern a neat, delicate appearance.
Finished Curtain Size and Measurements
The sample design is approximately 36 inches wide and 18 inches high. This size works nicely as a decorative window valance, especially in kitchens and smaller rooms.
Finished Project Measurements
- Width: Approximately 36 inches (91 cm).
- Height: Approximately 18 inches (46 cm).
- Flower count: 6–7 decorative flowers.
- Hanging loops: 7 evenly spaced loops.
- Bottom finish: Decorative scalloped lace edging.
Keep in mind that these are approximate measurements. Your finished dimensions may vary depending on yarn thickness, hook size, and individual crochet tension.
Make a Small Gauge Swatch First
Before making the full curtain, crochet a small sample using the same yarn and hook. Measure its width and height after gently blocking it.
If your stitches are too tight, try a larger hook. If the fabric looks too loose, use a smaller hook. A balanced stitch pattern will help your curtain hang beautifully without losing its delicate shape.
Basic Crochet Stitches and Abbreviations
This project uses simple crochet stitches combined to create an attractive lace pattern. The instructions below use US crochet terminology.
Stitch Abbreviations
- ch: Chain
- sl st: Slip stitch
- sc: Single crochet
- dc: Double crochet
- tr: Treble crochet
- sp: Space
- st: Stitch
- rep: Repeat
- sk: Skip
- MR: Magic ring
Important Stitches to Know
Chain stitch: This is the foundation of your crochet work. It creates the starting chain and the open spaces used throughout the lace pattern.
Single crochet: A short stitch that helps secure the lace arches and gives the curtain a neat structure.
Double crochet: This taller stitch creates the main fabric and forms the beautiful shell details.
Slip stitch: Used to join rounds, attach flowers, and finish decorative elements without adding extra height.
How to Crochet the Main Curtain Panel
Now comes the fun part! The main curtain is worked from the top down. The design combines simple foundation rows, open lace arches, and decorative shell stitches.
For this sample, the curtain is worked as one continuous panel with six decorative floral sections. This creates a more consistent finish and avoids unnecessary seams.
Before You Begin
The following pattern is a customizable written construction guide. Make a gauge swatch first, and adjust the foundation and repeat count to reach your desired window width. The stitch sequence is intended to create a similar lace effect to the finished design.
Step 1: Create the Foundation Chain
Foundation: With cream yarn, make 123 chains.
This is a starting example for a 36-inch curtain. The final width depends on your yarn and tension.
Keep your chains relaxed and evenly spaced. Avoid pulling the yarn too tightly, as a tight foundation can make the top edge curl or shrink.
Step 2: Work the First Row
Row 1: Dc in the fourth chain from the hook. Work 1 dc in each remaining chain across. Turn.
This row creates the solid foundation for the lace design. Count your stitches carefully and make sure the edges remain straight.
Step 3: Create the Open Lace Arches
Row 2: Ch 1, sc in the first stitch. *Ch 5, skip the next 4 stitches, sc in the next stitch.* Repeat from * to * across. Turn.
You should now see a series of open chain spaces. These arches will become the foundation for the decorative shell stitches.
Step 4: Add the Shell Pattern
Row 3: Ch 3, work 4 dc into the first ch-5 space. Sc into the next anchoring stitch. *Work 5 dc into the next ch-5 space, then sc into the next anchoring stitch.* Repeat across. Turn.
The five double crochet stitches create a small fan-shaped shell. These shells give the curtain its delicate lace texture.
Step 5: Build the Repeating Lace Design
Row 4: Ch 5, sc into the center dc of the next shell. *Ch 5, sc into the center dc of the next shell.* Repeat across. Turn.
Row 5: Ch 3, work 4 dc into each ch-5 space, placing an sc into the anchoring stitch between spaces. Repeat across. Turn.
Repeat Rows 4 and 5 until the curtain reaches your desired height. Keep the pattern consistent so the lace arches and shells line up neatly.
For the sample size, aim for approximately 18 inches in height, including the decorative bottom edging. Measure your work regularly instead of relying only on row counts.
How to Make the Beautiful Scalloped Bottom Edge
The scalloped edge is one of the prettiest details of this crochet floral window curtain. It gives the bottom a soft, decorative finish and creates lovely spaces for attaching the flowers.
Edging: Join cream yarn at the bottom edge. Work 1 sc along the edge to establish an even foundation. In each suitable chain space, work 7 dc to form a rounded scallop. Secure each scallop with an sc in the next anchoring point.
Continue across the entire bottom edge. Adjust the spacing so that the scallops look even and the fabric does not pull or wave excessively.
Helpful Edging Tip
Lay the curtain flat after completing a few scallops. If the edge begins to curl, check your stitch tension and spacing before continuing. Even spacing makes a big difference to the finished appearance.
How to Crochet the Pink 3D Flowers
The pink flowers are the main decorative feature of this design. Their raised petals make the curtain look more detailed and give it a lovely handmade character.
Use soft pink cotton yarn and make six or seven flowers, depending on the width of your curtain.
Flower Pattern
Round 1: With pink yarn, make a magic ring. Ch 1 and work 6 sc into the ring. Join with a sl st.
Round 2: *Ch 2, work 2 dc into the same stitch, ch 2, sl st into the next stitch.* Repeat around to create six small petals.
Fasten off and leave a long yarn tail for attaching the flower to the curtain.
For a fuller appearance, you can crochet a second flower layer using slightly smaller petals and attach it over the first layer. Arrange the petals so they do not sit directly on top of each other.
Attach the Pearl Center
Sew a small pearl-style bead into the center of each flower. Use a tapestry needle and secure it firmly at the back.
If the curtain will be used in a home with small children or pets, skip loose beads and make a small crocheted center instead. This creates a safer decorative alternative.
How to Crochet the Green Leaves
The green leaves complete the floral look. They add contrast against the ivory background and make the pink flowers stand out beautifully.
Leaf Pattern: With green yarn, ch 10.
Work 1 sc into the second chain from the hook, 1 hdc into the next chain, 1 dc into each of the next 4 chains, 1 hdc into the next chain, and 1 sc into the last chain.
Turn and work along the opposite side of the foundation chain, using matching stitches to shape the second side. Finish with a sl st and fasten off.
Make approximately 12 leaves, or two leaves for each flower. Weave in the yarn ends and gently shape each leaf with your fingers.
Floral Arrangement Tip
Place one pink flower in the center of each scalloped section. Position two green leaves behind each flower, with their tips pointing slightly outward. This arrangement creates a balanced and natural floral border.
How to Make the Crochet Hanging Loops
The hanging loops allow you to attach the curtain to a wooden or decorative curtain rod. They also give the top edge a neat and coordinated finish.
Loop Instructions
- Join cream yarn at the top edge of the curtain.
- Ch 8 to create the first hanging loop.
- Attach the chain to the next suitable point with a slip stitch.
- Work sc stitches around the chain loop to make it stronger.
- Repeat the process to create seven evenly spaced loops.
Before making all the loops, check that their spacing matches the width of your curtain rod. You can adjust the number of loops depending on the final size.
Final Assembly and Finishing
Once all the crochet pieces are ready, it is time to bring everything together. A little attention to finishing can make your handmade curtain look much more professional.
1. Attach the Flowers
Arrange the pink flowers along the bottom scalloped edge. Use the long yarn tails to sew them securely in place.
2. Add the Green Leaves
Attach two leaves behind each flower. Check that the green details are visible without covering the beautiful pink petals.
3. Secure the Yarn Ends
Use a tapestry needle to weave in all loose ends. Trim excess yarn only after checking that every decoration is secure.
4. Check the Hanging Loops
Slide the curtain rod through the loops and check that the curtain hangs evenly. Adjust any loops that appear too tight or too loose.
5. Block the Finished Curtain
Gently wet-block the curtain according to your yarn care instructions. Lay it flat, arrange the scallops, and allow it to dry completely.
Tips for Making Your Crochet Curtain Look Beautiful
Small details can make a big difference when working on decorative crochet projects. Keep these helpful suggestions in mind throughout the process.
- Use consistent tension: Even stitches create a smoother lace pattern and help the curtain hang properly.
- Choose matching yarn: Use compatible yarn weights for the curtain, flowers, and leaves.
- Count your repeats: Check your shell and mesh sections regularly to prevent uneven edges.
- Keep flowers symmetrical: Arrange the petals evenly before attaching them.
- Measure while working: Check the width and height before completing the decorative border.
- Block gently: Proper blocking improves the appearance of lace stitches and scalloped edges.
Beautiful Ways to Style Your Crochet Floral Curtain
This handmade curtain can become a lovely focal point in different areas of your home. Its soft ivory color and pink floral details work particularly well with natural and neutral decor.
Kitchen Window Decoration
Hang it above a kitchen sink or a small window. Pair it with wooden accessories, ceramic pots, and fresh flowers for a warm cottage-inspired look.
Bedroom Window Valance
Use the curtain as a decorative valance above a window. Soft bedding and neutral-colored curtains can complement its delicate lacework.
Cozy Cottage Interior
Combine it with natural wood, cream fabrics, and vintage-inspired accessories. The floral details will add a charming handmade touch without overwhelming the room.
How to Care for Your Handmade Crochet Curtain
Because crochet curtains are made with delicate yarn stitches, gentle care is important. Regular maintenance will help preserve their shape and keep the flowers looking fresh.
- Wash gently by hand using cool water and mild detergent.
- Avoid harsh scrubbing or twisting the crochet fabric.
- Press excess water out with a clean towel.
- Lay the curtain flat to dry and reshape the scalloped edges.
- Avoid hanging it while it is still wet, as the weight of water can stretch the stitches.
- Keep it away from sharp objects that could catch the open lacework.
Always check the care instructions for your chosen yarn before washing the finished project.
Frequently Asked Questions
1. Is this crochet floral curtain suitable for beginners?
It is suitable for confident beginners who already know basic crochet stitches. Beginners may find the lace arches, flowers, and decorative edging easier if they practice each element separately first.
2. How much yarn do I need to make this curtain?
For the sample dimensions, approximately 300–400 grams of cream yarn, 50 grams of pink yarn, and 25 grams of green yarn are suggested. Actual usage depends on yarn thickness, hook size, and stitch tension.
3. Can I make this curtain in different colors?
Absolutely! You can use white, beige, or pale yellow for the main curtain. Lavender, peach, red, or white flowers can also create beautiful color combinations.
4. Can I make the curtain wider?
Yes. Increase the foundation width while maintaining the pattern repeat. Make a gauge swatch first so you can calculate how many stitches are needed for your window.
5. Which yarn is best for crochet curtains?
Lightweight cotton yarn is a lovely choice because it provides good stitch definition and creates a neat lace appearance. Choose a yarn that is strong enough to support the finished fabric.
6. How do I keep the curtain from stretching?
Use an appropriate hook size, maintain even tension, and avoid hanging the curtain while wet. Gentle blocking and proper support from the curtain rod also help maintain its shape.
7. Can I make the flowers without pearl beads?
Yes. You can use small crocheted centers, embroidered knots, or simple pink yarn details instead of beads. This is also a practical option for homes with young children or pets.
Enjoy Your Beautiful Handmade Curtain!
Creating a crochet floral window curtain is a wonderful way to add personality and handmade beauty to your home. The combination of delicate ivory lace, pink flowers, green leaves, and scalloped edges gives this design a timeless charm.
Take your time with the lace pattern, enjoy making each little flower, and personalize the colors to match your room. Once finished, your handmade curtain will be a lovely decorative piece that brings warmth and creativity to your space.
Happy crocheting!
